
Step 1 – Gather Materials
Ensure you have all tools, supplies, and components listed below before starting. Missing tools or parts can delay installation.
- Small flathead screwdriver
- Phillips screwdriver
- Wire strippers
- Zip ties (for cable management)
- 2″ pipe clamps (included in kit)
- Conduit for field wiring (recommended for installs)
- Shovel (if trenching is needed, call 811 before digging)
- Field device(s) & corresponding cable/wiring
Any additional tools recommended by the field device manufacturer for sensor installations.
Step 2 – Choose a Location
Select a site that meets these criteria:
- Full sun exposure (south-facing preferred)
- Proximity to field device(s) to minimize wiring length
- If installing on a stand-alone pole, use a 10′ × 2″ conduit pole
Tip: Avoid shaded areas from trees, buildings, or tall equipment to maximize solar performance.
Step 3 – Mount the Enclosure & Solar Panel
- Mount the enclosure at eye level using the provided pipe clamps.
- Slide the solar panel into the top bracket on the enclosure (this will be wired later).
Confirm cord grips are accessible for routing wiring.
Step 4 – Install Field Device(s)
- Mount each sensor/device according to the manufacturer’s instructions.
- Route the wiring through conduit to protect it from weather and animals (Optional).
- Bury conduit where needed to prevent physical damage (Optional).
Step 5 – Determine Signal Type
Identify the signal type for proper wiring:
If unsure, contact eLynx Support before proceeding at 866-303-5969 or support@elynxtech.com
Step 6 – Connect Signal Wires
- Using a phillips head screwdriver, remove the enclosure cover.
- Route field wiring into the enclosure through a cord grip.
- Connect the signal wire to the correct horizontal signal rail terminal based on Step 5.
Remember: D1 and D2 support alarm cry-out and will wake the unit when triggered.
Step 7 – Connect Device to Power
- Connect device (+) and (–) wires to the vertical power rail, starting from the bottom.
Note: Power jumpers are pre-installed from the horizontal rail to (+) and (–) terminals. If installing more than 4 devices, you may double up on power terminals.
 Step 8 – Power the Unit
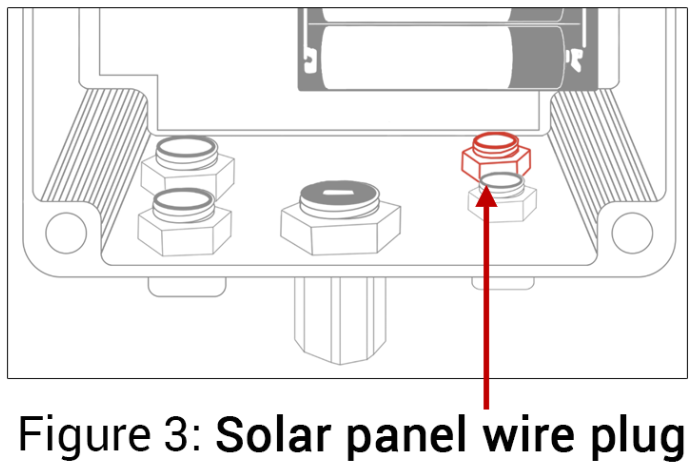
- Route the solar panel cable to the back right waterproof plug on the enclosure.
- Insert the end and tighten the sealing nut.
- Press the BATT button in to power on.
- Verify a blue LED light above the batteries confirming power is on. (wait up to 1 min)
Step 9 – Verify in the Application
- Wait a few minutes for the unit to begin transmitting.
- In the eLynx application, you can:
- View live device data
- Assign a device name
- Set location coordinates (lat/long)
- Configure alarms and notifications
- View live device data
Step 10 – Finish & Secure Wiring
Once all work is complete, install the enclosure cover, install cord grip nut from inside, and use zip ties or clamps to secure any excess cable/conduit to the pole.
Comments
0 comments
Please sign in to leave a comment.